Traefik and WireGuard as a reverse proxy for a Minecraft server
On this page
Background
I host Minecraft servers for friends on vanilla or modded instances. I previously ran Minecraft on AWS ECS Spot instances with a Discord bot to start and stop the server on demand. After buying a mini PC (Beelink Mini S12 Pro) to replace my Raspberry Pi 4B, hosting directly at home became the cheaper option.
The problem
Hosting at home requires exposing the server to incoming traffic. Standard port forwarding exposes the home router’s public IP address, creating a target for denial-of-service traffic. Requiring every player to join a VPN introduces friction. Cloudflare Tunnel handles HTTP, but free accounts do not tunnel raw TCP or UDP traffic. Tools like ngrok or LocalXpose charge around $15 per month for custom domain support.
The solution
The solution is a minimal EC2 instance acting as a reverse proxy. It bills per second while running, accepts a custom domain, and can be stopped whenever players are offline.
How it works
Wireguard will act as a bridge between the mini PC and the proxy server. The proxy server runs Wireguard server, and the mini PC will connect to the proxy server using a Wireguard client. The proxy server will then use Traefik to route the incoming TCP and UDP traffic to the Minecraft server running on the mini PC.
Source
graph RL    subgraph Mini PC        mc[Minecraft Server]    end
    subgraph Proxy Server        traefik[Traefik]    end
    traefik -- Wireguard --> mc
    subgraph Players        p1[Player]        p2[Player]        p3[Player]    end
    p1 --> traefik    p2 --> traefik    p3 --> traefik
Every player will connect to the proxy server, and the traffic will be routed to the mini PC. This way, the mini PC doesn’t have to reveal its public IP address. The proxy server can be easily switched off when it’s not needed anymore (when we’re done with Minecraft).
EC2 instance selection
The proxy only needs enough resources to route network packets through Traefik and WireGuard. A t4g.nano instance runs on AWS Graviton processors at roughly $0.0042 per hour ($3.00 to $3.50 per month if left on continuously). WireGuard provides the encrypted tunnel between AWS and the home server, while Traefik handles incoming TCP and UDP traffic on the public ports.
Setting up the proxy server
I won’t go into detail about setting up an EC2 instance, but I will show you how to set up Traefik and Wireguard on it. First, you need to
install Docker and Docker Compose on the instance. Then, create a docker-compose.yml file with the following content:
version: '3'
services:  proxy:    image: traefik:latest    container_name: proxy    network_mode: host    volumes:      - ./:/etc/traefik
This is a simple docker-compose.yml file that will run Traefik on the host network. The volumes section is used to mount the current
directory to the /etc/traefik directory inside the container. This is where we will put the Traefik configuration file.
Next, create a traefik.yml file with the following content:
accessLog: filePath: /etc/traefik/access.loglog: level: DEBUGapi: dashboard: true insecure: trueproviders: file: filename: /etc/traefik/dynamic_conf.yml watch: trueentryPoints: mc-java: address: ":25565" mc-bedrock: address: ":19132/udp"This is the Traefik configuration file. It tells Traefik to listen on two entry points: mc-java and mc-bedrock. The mc-java entry point
is for the Java edition of Minecraft, and the mc-bedrock entry point is for the Bedrock edition. The providers section tells Traefik to
use a file provider to read the dynamic configuration from the dynamic_conf.yml file. The api section enables the Traefik dashboard.
Now, create a dynamic_conf.yml file with the following content:
tcp:  routers:    mc-java:      rule: HostSNI(`*`)      service: mc-java      entryPoints:        - mc-java  services:    mc-java:      loadBalancer:        servers:          - address: "10.10.0.2:25565"
udp:  routers:    mc-bedrock:      service: mc-bedrock      entryPoints:        - mc-bedrock  services:    mc-bedrock:      loadBalancer:        servers:          - address: "10.10.0.2:19132"
This is the dynamic configuration file. It tells Traefik to route TCP traffic from the mc-java entry point to the mc-java service, and UDP
traffic from the mc-bedrock entry point to the mc-bedrock service. The loadBalancer section specifies the address of the Minecraft server.
Now, assuming you already have docker compose installed, you can start the Traefik container by running the following command:
docker-compose up -dThis will start the Traefik container in the background. You can access the Traefik dashboard by going to http://<your-ec2-instance-ip>:8080.
Don’t forget to open the ports 8080, 25565, and 19132/udp in the security group of your EC2 instance.
Setting up the Wireguard server
Now that the proxy server is set up, you need to set up the Wireguard server on the proxy server. First, install Wireguard on the EC2 instance by following the instructions here. Then, generate a private key and a public key for the Wireguard server
wg genkey | tee privatekey | wg pubkey > publickeyThis will generate a private key and a public key for the Wireguard server. Next, create a wg0.conf file with the following content:
[Interface]Address = 10.10.0.1/24PrivateKey = <proxy-server-private-key>ListenPort = 51820
[Peer]PublicKey = <home-server-public-key>AllowedIPs = 10.10.0.2/32
This is the Wireguard configuration file. It tells Wireguard to listen on port 51820 and assign the IP address
10.10.0.1 to the Wireguard server. The AllowedIPs section specifies the IP address of the home server. Replace
<proxy-server-private-key> with the private key of the proxy server and <home-server-public-key> with the public key
of the home server.
Notice that we’re using a private IP address range 10.10.0.1/24 for the Wireguard connection. The Wireguard server
will act as a bridge between the home server and the proxy server, and it uses the defined IP address range to identify
devices in the private network. We can use any private IP address range, but I chose 10.10.0.1/24 arbitrarily.
The AllowedIPs section defines the IP addresses that can connect to the Wireguard server. In this case, we’re only allowing
the home server to connect to the Wireguard server. I specified the IP address 10.10.0.2 for the home server, but you can use
any IP address as long as it’s in the 10.10.0.1/24 range.
In the ListenPort section, we specify the port that the Wireguard server will listen on. This is the port that the
home server will use to connect to the Wireguard server. We can use any port, but I chose 51820 following Wireguard’s
default port. Having this set up, make sure you open port 51820 in the security group of your EC2 instance.
After creating the wg0.conf file, you can start the Wireguard server by running the following command:
wg-quick up wg0Setting up the Wireguard client
Now that the Wireguard server is set up, you need to set up the Wireguard client on the home server. First, install Wireguard on the home server. Then, generate a private key and a public key for the Wireguard client, just like we did for the Wireguard server.
wg genkey | tee privatekey | wg pubkey > publickeyThis will generate a private key and a public key for the Wireguard client. Next, create a wg0.conf file with the following content:
[Interface]Address = 10.10.0.2/24PrivateKey = <home-server-private-key>
[Peer]PublicKey = <proxy-server-private-key>Endpoint = <ec2-instance-ip>:51820AllowedIPs = 10.10.0.1/32PersistentKeepalive = 25
It’s the same as the Wireguard server configuration file, but with the Address and PrivateKey sections changed. The Address section
specifies the IP address of the home server, AllowedIPs specifies the IP address of the proxy server. Since we’re setting up a Wireguard
client, we don’t need to specify the ListenPort section, but we need the Endpoint section to define the address of the proxy server.
The PersistentKeepalive section specifies the interval at which the home server will send keepalive or heartbeat packets to the proxy server.
This is necessary to keep the Wireguard connection alive, especially if the home server is behind a NAT. I chose 25 seconds, but you can use any
value that you want.
After creating the wg0.conf file, you can start the Wireguard client by running the following command:
wg-quick up wg0Setting up a custom domain
Finally, now that the Wireguard server and client are set up, you can set up a custom domain for the proxy server if you have your own domain. This is optional, but it’s a good idea to have a custom domain so that you can easily switch the proxy server off when you don’t need it. Your Minecraft server address will also be easily remembered by your friends.
For this step, you just need to set up a DNS record for your domain that points to the public IP address of your EC2 instance. You can do this
by going to your domain registrar’s website and adding an A record that points to the public IP address of your EC2 instance. If you’re using
Cloudflare, you can follow the instructions here.
Cost and outcome
This setup lets friends join via a custom domain without exposing the home server’s IP address or requiring client-side VPNs. Running the t4g.nano instance for 20 days cost under $3.00:
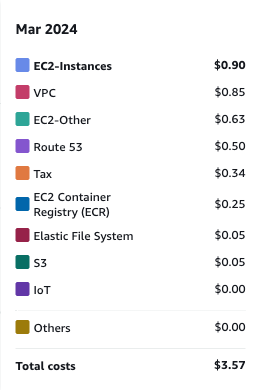
Cost of running t4g.nano for 20 days.
Stopping the instance when nobody is playing keeps the monthly AWS bill under $2.00.
Comments
Replies from the fediverse to @yuris@fedi.yuris.dev's post about this article.
No replies yet — open the post above from any Mastodon or fediverse app, reply to it, and your reply will appear here.